Saturday, July 30, 2011

Meatless miracles from the Middle East

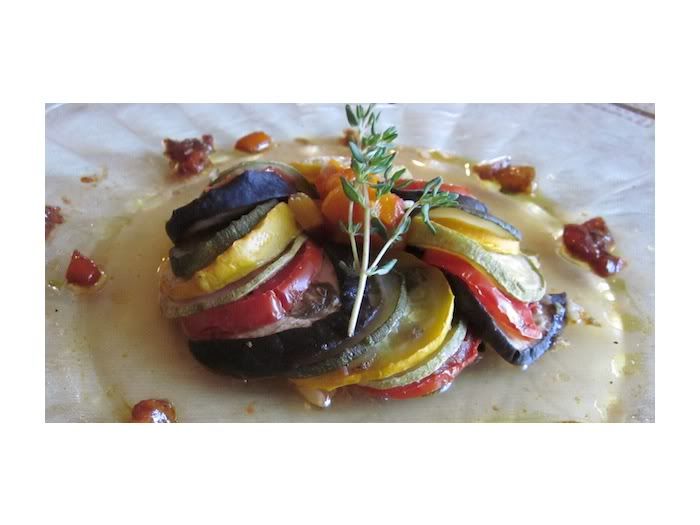
Vegetarian food often scares many carnivores away.  While some of us steak-eaters enjoy a nice block of tofu or tempe from time to time, these same veggie proteins give the impression of tastelessness to so many.  And their fears are well founded.  So many restaurants treat vegetarian food with the same blandness that they expect when they eat it.  But just because plain tofu and raw veggies may not appeal to our taste buds doesn't mean that there isn't a spice that can't, well, spice things up!

That's where falafel comes in.  This Middle Eastern veggie patty of sorts is not nearly as healthy as tofu, but with with cumin and coriander as its spice base, it's definitely more flavorful!  Serve it in a wrap with baba ganoush or tahini sauce and you've got a lunch that is delicious and filling all while being 100 percent meat free!  

In Europe, falafel are sold in nearly every market and at countless street vendors.  Yet, here in America, finding a falafel plate is still pretty rare, as they only seem to exist in special vegetarian or Middle Eastern restaurants.  Well, just in case you were craving that crispy and smooth spiced goodness (or just dying to try it for the first time), the Giddy Gourmands have you covered!


Baked Falafel
by Sean (modified by Chef E)

Makes 10 patties

Ingredients:

1 (15 oz) can chickpeas, drained
1 onion, chopped
1/2 cup fresh parsley
3 to 5 cloves garlic, chopped
1 egg
2 tsp ground cumin
1 tsp ground coriander
1 tsp salt
dash of ground pepper
dash of thyme
pinch of cayenne pepper
1 tsp lemon juice
1 tsp baking powder
1 tbsp extra virgin olive oil
1 1/2 cup dry bread crumbs

Directions:

Preheat oven at 400°F.  In a large bowl, mash chickpeas.  (Note:  Do not blend chickpeas, as the consistency will be too thin.)  In a blender, mix onions, parsley and garlic until smooth.  Stir into chickpea mixture.  In a medium bowl, combine egg, lemon juice, cumin, coriander, salt, pepper, cayenne and baking powder and whisk well.  Stir into chickpea mixture along with olive oil.  Bit by bit, add breadcrumbs until mixture is not sticky.  Form into 10 patties.  

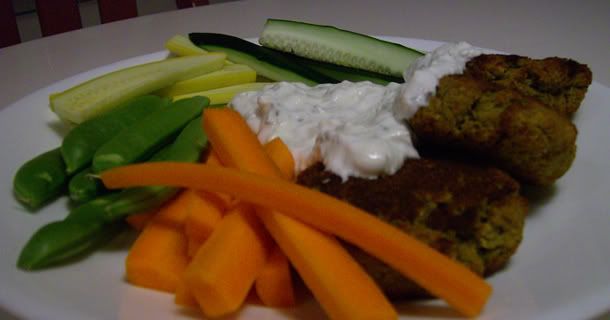
Place each patty on a well greased cookie sheet.  Bake for 10 minutes.  Turn over the patties, regrease and bake for another 10 minutes.  Then broil the falafel for 2 minutes on each side.  Serve alone or in flatbread with chopped tomatoes and tzatziki or tahini.  


Side Dishes

Although falafel can easily be eaten as a solo dish, sauces and dips are always a great way to experience the great mix of flavors that the spices can offer.  And despite its Greek origin, tzatziki is a wonderful fresh sauce to dip your new vegetarian delights (or just some crudités) into.  Also, did we mention that its  fat free yet completely creamy?  Yeah.  We love it too.

Tzatziki Cucumber Dip
by Chef E

Ingredients:

1 (17.6 oz) container of 0% fat Fage Greek yogurt
1 to 1 1/2 tsp garlic, grated
1/2 cup cucumber, grated and strained
1 tbsp lime juice
1/2 tsp salt

Directions:

Grate cucumber and strain in a paper towel or cheesecloth.  In a medium bowl, combine ingredients.  Mix well.  (Note: Adjust garlic depending on your tastes, but too much raw garlic has a tendency to taste a bit spicy.)  Keep refrigerated.

Serve cold with sticks of raw cucumber, carrots, snap peas, blanched broccolini, zucchini or yellow squash.  Use it to decorate a variety of dishes!


Bon Appétit!

Vegetarian food doesn't have to be synonymous with "bland."  In fact, it hasn't been that way for a while now.  Thanks to foods from the East and places in between, diners who have given up meat (or even those who still enjoy a burger or two) can enjoy food that is full of spice, robustness and fiber!  Try these dishes with a nice sparkling wine, some limeade or whatever drink reminds you of a fresh summer day and you're set to enjoy a glorious, meatless meal.  

Friday, July 22, 2011

We'll make you a dessert you can't refuse

The French may corner the market on gourmet meals and desserts, but it goes without saying that the Italians aren't far behind.  From pasta puttanesca to pizza primavera, Italian food is a staple in the American kitchen.  However, when it comes to dessert--apart from everybody's favorite meal-ender, tiramisu--Italians have a slew of delicious and practically unknown sweets to top off your dinner.

To the non-Italian, many of the traditional desserts sound strange and unappealing.  Spumoni (an Italian flag-inspired ice cream dessert), for instance, often is avoided because of the strange inclusion of pistachio ice cream alongside cherry and vanilla ice cream.  And when people hear the secret about tiramisu, they tend to offer strange looks of disbelief in response.  Sweet marscapone?  Cheese?  How could it be true!  Yet tongues and taste buds seem to always move past the cheesy truth to taste the sweet, smooth cream that sits atop those ladyfingers.  

Cannoli are very similar to their famous cousin, tiramisu.  Before they are taken in lieu of guns ("The Godfather," anyone?), they too are filled with sweet cheese.  But this cheese, ricotta, is more famous for its savory starring role in lasagna.  Ricotta, like cottage cheese, is full of small cheese curds, giving it a lumpy quality.  Naturally, while the smoothness of marscapone can easily be forgiven, not everybody enjoys pieces of cheese curd in their dessert.  Plus, the traditional cannoli contain candied citron, a crunchy additive that many might rather avoid.  It's no wonder the average American hardly knows about cannoli--they hardly seem edible!

But the good news is that cannoli are not a fixed construct.  Adding marscapone to cut the curd of the ricotta is one viable option.  Another is to play with flavors and garnishes in order to create the perfect cannoli that you will love just as much as your tiramisu.  Lucky for you, the Giddy Gourmands have got you four flavors to get you started!


Cannoli Siciliani
by Chef E

Yields 12 cannoli (24 mini cannoli)

Ingredients:

1 cup powdered sugar
1 cup ricotta cheese
1 cup marscapone cheese
1 tsp rum
cannoli shells
maraschino cherries, sliced in half (2 per cannoli)
1/2 cup pistachios, shelled and diced

Directions:

In a large bowl, combine ricotta and marscapone until smooth.  Using an electric hand mixer, add in powdered sugar, a bit at a time.  Add rum.  Fill shells using a spoon or a piping bag.  Place half a cherry on each end.  Dip the bottom half of each end in pistachios.  Serve immediately.  


Chocolate Chip Cannoli
by Chef E

Yields 12 cannoli (24 mini cannoli)

Ingredients:

1 cup powdered sugar
1 cup ricotta cheese
1 cup marscapone cheese
1/8 tsp vanilla extract
1/4 cup mini semi-sweet chocolate chips
cannoli shells

Directions:

In a large bowl, combine ricotta and marscapone until smooth.  Using an electric hand mixer, add in powdered sugar, a bit at a time.  Add chocolate chips (do not use hand mixer).  Fill shells using a spoon or piping bag.  Serve immediately.

For added taste and appearance, melt an additional cup or two of semi-sweet chocolate chips in a double boiler and dip each end of the shells before filling.  


Chocolate Cannoli
by Chef E

Yields 12 cannoli (24 mini cannoli)

Ingredients:

1 cup powdered sugar
1 cup ricotta cheese
1 cup marscapone cheese
1/2 cup melted dark chocolate
1 tsp Kahlua
1 tbsp coffee, cold
cannoli shells

Directions:

In a large bowl, combine ricotta and marscapone until smooth.  Using an electric hand mixer, add in powdered sugar, a bit at a time.  Melt chocolate in a double boiler--allow to cool for 10 to 15 minutes.  Add chocolate to filling mixture.  Add Kahlua and coffee.  (Note: Ensure that the coffee is cool or room temperature.)  Fill shells using a spoon or piping bag.  Serve immediately.

For added taste and appearance, dust cannoli with extra powdered sugar.  


Lemon Cannoli
by Chef E

Yields 12 cannoli (24 mini cannoli)

Ingredients:

1/2 cup powdered sugar
3/4 cup ricotta cheese
3/4 cup marscapone cheese
1/4 cup lemon curd
1/4 tsp lemon zest
cannoli shells

Directions:

In a large bowl, combine ricotta and marscapone until smooth.  Using an electric hand mixer, add in powdered sugar, a bit at a time.  Add lemon curd and zest, mixing well.  Fill shells using a spoon or piping bag.  Serve immediately.

For added taste and appearance, dust top of cannoli with extra powdered sugar.  


Bon Appétit!

With these flavors on your platter, there's no denying that, even with cheese as their base, cannoli can be a delectable alternative to ice cream or cake.  And although the larger size of shell is more traditional, the mini cannoli shells will make it easier for your guests to try each of your unique desserts.  And smaller cannoli mean that your guests can go back for seconds, if you're lucky ... or unlucky!


Sunday, July 17, 2011

Bite-size bound

True Asian dining often yields dishes that offer natural portion control.  In Japanese cuisine, this is recognized by most people as sushi--a medley of flavors served up in bite-sized pieces.  However, in Chinese-American cuisine, many people fall into the trap of Lo Mein or Teriyaki Chicken, so often served slathered with sauce with a large side of fried rice.  Only recently has Dim Sum--the Tapas of the East--become popular in the West, but if you're not one to cook up five different mini meals for yourself just to keep your portions down, then moving away from the fried egg-noodles might be a difficult transition.

However, if you are familiar with any Asian cuisine, you know about the glory of pot stickers.  These small, two-bite dumplings are infinitely customizable, dip-able and, of course, delicious.  Plus, put five of them on your plate and you'll be surprised how full you'll be once you've consumed the lot.  Made with turkey, pork or beef and spiced any way you want, these fried and steamed dumplings can create a meal that you're proud of (and not regretting later).

As it is with many of the best Asian dishes, however, pot stickers are no walk in the park.  The filling itself isn't difficult to make, though everything you put inside must be chopped very finely.  No, the chore comes to creating the dumplings, crimping the edges and making sure that the wrapper dough doesn't stick and pull apart.  These dumplings are by no means a 30-minute meal, but making them can be fun and seeing the finished product is so fulfilling (in more ways than one).


Beef Pot Stickers
by Chef K and Chef E

Makes 30-40 dumplings

Ingredients:

3/4 lb ground lean beef
1 egg
2 tbsp soy sauce
2 tbsp ginger, grated
2 cloves garlic, grated or pressed
1/2 cup green onion, finely chopped
1/2 cup water chestnuts, finely chopped
1/2 cup shitake mushroom, finely chopped
1 tsp sesame oil
black pepper
40 gyoza wrappers
Canola oil (for frying)

Directions:

In a large bowl, combine beef, egg, soy sauce and sesame oil.  Add ginger, garlic, onion, water chestnut, mushroom and pepper.  Fry up a tsp of mixture to taste and make adjustments.

Lay gyoza wrappers on wax paper.  (Note: You may want to keep a small bowl of all-purpose flour nearby to keep the dough from sticking from surfaces or each other.)  Place tsp of mixture into center of gyoza wrapper.  Dipping your finger in water, trace around half the wrapper.  Fold over and pinch to seal well, especially at bottom corners.

In a large frying pan, fry 5-7 dumplings seam-up in 1 tbsp of oil on medium heat for 30 seconds or until bottoms are golden brown.  Then add 1/4 cup water.  Immediately turn heat to low, cover and cook for 7-8 minutes, until the dumplings look translucent or most of the liquid has evaporated.

Serve up with a small cup of white rice and steamed baby bok choy and enjoy!

Try this recipe with ground pork or turkey and play with your own spice combinations.  Try adding cabbage for a veggie twist or Chinese Five Spice for an interesting flavor.  Either way, no dumpling would be complete without a delicious dipping sauce that's both sweet and savory!

Gyoza Dipping Sauce
by Chef E

Ingredients:

1/2 cup soy sauce
2 tbsp sugar
2 tsp sesame oil
1 tsp toasted sesame seed
2 tsp garlic powder
2 tsp onion powder

In a small bowl, combine soy sauce and sugar, whisking well.  Add sesame oil, sesame seed, garlic powder and onion powder and mix well.  Use as a dipping sauce or pour over dumplings!


Side Dishes

Sometimes, your tastebuds demand something so delicious that there's no way it could be good for you.  And when it's paired with a lighter, healthier meal, by all means, have at it!  That's why we came up with this delicious crab rangoon recipe--crispy, creamy and salty--for your dining pleasure!


Crab and Cream Cheese Rangoons
by Chef E

Ingredients:

1 pkg (8 oz.) Philadelphia cream cheese, softened to room temperature
1 can crab meat, drained OR 4 oz lump crab meat
white pepper
wonton wrappers

For best results, use lump crab meat from your grocery store's seafood section.  If using canned crab meat, drain it from the can and, using a cheesecloth, wring the crab meat until it is very dry.  Wherever you get your crab meat, you must ensure that the meat is dry or else you will not be able to successfully fry your rangoons.  (A big thanks to Foodie in Disguise for helping us figure this one out!)

Mix in the crab with the softened cream cheese until smooth.  Add white pepper to taste.

Place tsp of mixture into center of wonton wrapper.  Turn the wrapper so that the corner faces you and that it looks like a diamond.  Dipping your finger into water, trace the bottom two sides of the wonton wrapper and fold the corner upward, sealing the corner and sides 1/8 inch away from the top.  Then, fold in the left and right corners, sealing one on top of the other, to form a pastry that looks like an open envelope.

Fry them in oil that is at 350 to 375°F for about a minute or until golden brown.  Let them sit on a paper towel to dry.  Serve immediately and enjoy!


Bon Appétit!

Sure, these dishes might not be authentic, but if you grew up eating Asian-American food like us, why not enjoy a more gourmet version?  And the fillings for both the pot stickers and the crab rangoons are really up to you--go vegetarian for one and turkey and vegetable for the other.  Regardless of what you do, their manageable size remains the same, leaving you to fill your belly one tasty bite at a time!  (Though, learning how to use chopsticks is a whole other matter!)

Tuesday, July 12, 2011

Light eats with 'little meats'

Everybody loves a taco.  They're simple, they're light and you can fill them with pretty much anything:  Chicken, steak, fish--they're all doable and all delicious!  But in the shadow of pollo asado and carne asada (or even barbacoa, if you can risk it!), there are some "little meats" that make some pretty tasty tacos.  And while some people don't eat pork, for those of us who do, carnitas are a delightful alternative to the norm!

Pork often gets a bum rap because of other famously fatty pig products, such as bacon or baby back ribs, but the inner soft, stringy texture and outer crispiness of the carnitas are due to the fat melting away.  Carnitas are by no means the leanest of the meats, but if they're made right, there is no reason to shy away from that dreamy texture and that lovely flavor--especially when it's so easy to make!

Unlike marinated steak or chicken, marinated pork that has been cooked in a way to be crunchy on the outside yet tender on the inside--all the while remaining completely pull-able and pluck-able--might seem complicated to cook up.  However, all it takes is a bit of ingenuity in the marinade department and a movie to watch while you wait for the slow-cooked goodness to ensue.


Island Carnitas Tacos
by Chef E, Chef K and Chef S

Ingredients:

4 1/2 lbs pork tenderloin or rump roast
1 can (13.66 oz) Thai Kitchen lite coconut milk
1 container (17 oz) Vita Coco water (coconut water)
1/4 cup lime juice
2 bottles of Carona Extra
1 onion, chopped into large chunks
1 to 2 tsp medium red chile powder
cayenne
sea salt
white pepper

Directions:

Preheat oven to 350°F.  In a medium bowl, combine coconut milk and coconut water, mix well.  In a large, deep lasagna pan, add coconut mixture, Corona, lime juice, onion, salt and spices.  (Note: For smaller ovens, try using multiple smaller lasagna pans.)  Mix well.  Add meat, trying to keep the pieces separate if you are using multiple pieces.  The liquid should come up to at least 1/2 the height of the meat--if not, feel free to spoon some liquid over the top.  Cover the pans with foil, sealing it well around the edges, and place in the oven.  Bake for 1 1/2 to 2 hours.

Meat should be tender enough to be pulled apart by a fork.  Drain liquid from the pan, but leave onions.  At this stage, you may want to add additional dry rub spices on the outside of the pork--perhaps more salt, chili, black pepper--depending on how you want your final product to taste.  Next, using forks, pull apart the meat into smaller chunks, but not too small of pieces.  spread them out across the bottom of the pan.  Put back into the oven uncovered for another 20-30 minutes depending on how crispy you want them.  (Note: Keep an eye on them at this stage so that they don't get too crispy!)

Serve them on soft corn tortillas with diced onions and cilantro for a street-style taco, or quickly fry up some strips of onion and red bell pepper with salt and pepper for a fajita-style taco!


Side Dishes


Sweet Bean and Jicama Salad
by Chef E

Ingredients:

2 can pinto beans
2 can black beans
1/4 of a jicama root, diced
1/2 cup green onion, diced
1/2 tomato, diced
1 cup corn
handful of chopped cilantro
olive oil
balsamic vinegar
salt
pepper
medium red chili powder

Empty pinto beans into colander and rinse gently.  Lay beans out evenly over paper towel and cover with another paper towel.  Repeat with black beans.  Leave to dry for 10 minutes.

In a large bowl, combine jicama, corn, tomato, onion, cilantro, salt and spices to taste.  Add beans.  Drizzle olive oil and balsamic vinegar (sparingly).  Mix gently and enjoy!


Bon Appétit!


On warm summer days, tacos are a great way to eat a light, relatively healthy, flavorful meal, especially with a nice cerveza or a limeade to cleanse your palate.  Paired with a veggie salad full of fiber, you've got a yummy plate that's sure to leave you feeling full and as happy as a pig in...well, you know.

Thursday, June 30, 2011

Desserts in a demitasse

Cupcakes, for lack of a better digital-age analogy, are trending—but they aren’t your grandma’s cupcakes!  Long gone are the days of being satisfied by bakery cupcakes covered with neon frosting, heaps of sprinkles and plastic picks of Scooby Doo.  No, the love of these single-serving treats is of a “Cupcake Wars” quality.  It’s all about gourmet cakes and frostings—even unique combinations of the two.  Welcome to the Golden Age of cupcakes!

And in an decade when the personalization of homes, cars, smart-phones and internet profiles is commonplace, it's only natural that we apply this "what suits me?" attitude to our food.  Cupcakes are some of the most customizable foods, and, presuming you like cake, delicious mini statements of who we are.  Because we are no longer limited by chocolate and vanilla, the unlimited flavor combinations can be unique to our person as our DNA.  John Doe likes Cookies 'n' Cream.  Jane Doe likes vanilla bean and lemon.

Although the gourmet cupcake is known better from the TV shows and cupcakeries that tout it, the average chef can have his or her own fun with the bite-sized dessert.  We'll be the first to admit that places like Sprinkles or The Perfect Circle Cupcakery, both So-Cal favorites (and winners of "Cupcake Wars"), seem to do these things better than three wannabe chefs with a foodie blog, but we made some funky concoctions that we loved!  (And we think you might like them, too!)


Can't Beet the Heat Red Velvet Cupcakes* (w/ Spiced Frosting)

Yields 12 cupcakes

Ingredients:

1 cup beet puree (from canned beets)
3 tsp beet-juice reduction
3/4 cup sugar
3/4 all-purpose flour
1/3 cup Dutch process cocoa
1/2 cup canola oil
1/4 cup milk
1 tsp greek yogurt
1 tsp baking powder
1/2 tsp baking soda
1/4 tsp salt

Directions:

Preheat oven to 350°F.  Line each well of a muffin/cupcake pan.  In a medium bowl, combine the dry ingredients and set aside.  In a large bowl, combine beet puree, beet-juice reduction, oil, milk, yogurt and eggs.  Slowly add in the dry ingredients.  Mix well.  Fill 3/4 of the way.  Bake for 15 minutes or until toothpick comes out clean. 

For beet-juice reduction: Using the beet juice from the canned beets, bring liquid to a boil.  Boil for 8 to 10 minutes.  Let cool. 

Note: Dutch process cocoa might be difficult to find.  We were unable to find it in our local market.  However, it is finer, richer and has a reddish hue, a key factor in keeping the beet-red color of your Red Velvet cupcakes!


Spiced Buttercream Frosting

Ingredients:

1 cup salted butter, softened
3 3/4 cups powdered sugar
1 teaspoon vanilla extract
1/4 cup milk
1/2 tsp cinnamon
1/4 tsp nutmeg
1/8 tsp cloves

Directions:

Place softened butter in a medium bowl.  Using an electric mixer, slowly add powdered sugar, mixing well every 1/4 cup.  (This is particularly important if using a hand-mixer.)  Add milk.  Mix well.  Add spices.  Mix well.  Put in a frosting bag and pipe on.


Key Lime Chocolate Cupcakes**

Yields 30 cupcakes

Ingredients:

2/3 cup Dutch process cocoa
2 cups all-purpose flour
1 1/4 teaspoon baking soda
1/4 teaspoon baking powder
1 2/3 cups sugar
4 eggs
1 cup mayonnaise
1 1/2 tsp vanilla extract
1 1/3 cups water
3 tsp coffee

Directions:

Preheat oven to 350°F.  Line each well of a muffin/cupcake pan.  In a medium bowl, combine the dry ingredients and set aside.  In a large bowl, combine water, mayonnaise, vanilla and eggs.  Slowly add in the dry ingredients.  Mix well.  Fill 3/4 of the way.  Bake for 15 minutes or until toothpick comes out clean.
 

Key Lime Buttercream Frosting

Ingredients:

1 cup salted butter, softened
4 cups powdered sugar
zest and juice of a lime
1 teaspoon vanilla extract
1/4 cup milk
Key limes (for garnish)

Directions:

Place softened butter in a medium bowl.  Using an electric mixer, slowly add powdered sugar, mixing well every 1/4 cup.  (This is particularly important if using a hand-mixer.)  Add milk and vanilla.  Mix well.  Add lime juice and zest.  Mix well.  Put in a frosting bag and pipe on.  Garnish with a wedge of key lime for extra panache!

On picking limes: The best, juiciest limes are dark green and heavy.  Avoid picking light or yellow limes!

Bon Appétit!

We ran into a color snag with our Red Velvet cupcakes—they didn’t come out too red.  Even after a few dozen drops of red food coloring, they decided to stay brown.  However, as we mentioned previously, we couldn’t get our oven mitts on a canister of Dutch process cocoa.  Just so you know, the color doesn’t affect the sweet, earthy, chocolaty flavor!

But regardless of the color of your cupcakes—or for what meal you eat them—these tasty hand-helds go great with a few combinations.  Have your Spiced Red Velvet cupcakes with a cup of tea, or try your Key Lime Chocolate cupcakes with a glass of cool, refreshing coconut water.  You might even want to mix and match cakes and frostings!  Either way, cupcakes of all types always go well with milk!
  

*Red Velvet cake recipe thanks to Coconut & Lime
*Chocolate cake recipe thanks to Couture Cupcakes


Tuesday, June 21, 2011

Finding a bit of Southern seafood comfort

When you're looking for a delicious grab-bag of flavor, shellfish is where it's at.  However, while many people will jump at the opportunity to drink a shrimp cocktail, certain crustaceans and bivalves can either be too tough to crack or too slimy to stomach for even the most adventurous of seafood lovers.  Crab legs are (literally) a pain and often the battle with the sea-spider's armor hardly seems worth the amount of booty within.  Oysters are stubborn shuckers, and even if you order them on the half-shell, their flavor and booger-esque texture are usually a taste the person doing the slurping must acquire.


But if you're anything like us here at The Giddy Gourmands (who are natives to the fish-filled state of Southern California), you love to open the hatch and let those gooey, oceanic pearls slide down your gullet--and face a challenge head on.  And, truthfully, there are ways of getting around those aforementioned obstacles: Canned lump crab is far less stressful to open, as are fresh oysters in the jar.  Now, we aren't suggesting that you put cans and jars on ice instead of legs and shells, but for gumbo--yeah, you heard us--it works like a charm!


When it comes to fish on the West Coast, we're all about filets, sushi and snow crab legs on a mountain of ice; dishes like gumbo aren't exactly found on every menu.  However, with its rich tomato base, the "Holy Trinity"--onions, bell peppers and celery--and everyone's favorite wild card, okra, gumbo is a great equalizer for all of those strong fishy flavors.  Also, did we mention it smells pretty tasty?  With a pot of the Giddy Gumbo bubbling on your stove for an hour or two, your house is guaranteed to smell as if it's got a chef (or three) living in it!


Giddy Gumbo
by Chef E, Chef K and Chef S


Serves 6


Ingredients:


10 oz jar of oysters
1/2 lb raw, peeled shrimp, cut up
8 oz lump crabmeat
10 oz sliced okra 
1/2 cup celery
1/2 cup bell pepper
1 cup onion, diced
1 cup tomato puree
1/2 cup chopped tomato
2 tsp garlic, diced
2 tbsp butter
3 tbsp all-purpose flour
4 cups poultry stock 117, chicken broth 121
salt
pepper
paprika
cayenne
thyme
chopped parsley (on top)
filé powder (on top)

Directions:


In a large pot, melt butter over medium heat.  Add onions.  Once they are golden brown (approx. 10 minutes), add in flour, mixing well between tablespoons.  Add tomato puree and chicken broth, whisking until smooth.  Add garlic.  Add (to taste) salt, pepper, paprika, cayenne and thyme.


Add shrimp, crab meat (picked over for shell and cartilage) and sliced okra.  Reduce heat and simmer until okra is tender (approx. 20 minutes).  Then, add oysters, cooking until oysters are plump.  (Note:  Depending on your preferences and how large your oysters are, you may want to cut them up before adding them.)


Leave gumbo on low heat until you are ready to serve.  Then, trim parsley and sprinkle filé powder over the top, stirring in before serving.  (Note: Filé powder might be hard to find at your local grocery store, so while it may be a typical gumbo spice, you may find yourself omitting it like we had to.)


Serve over some white rice and enjoy!


Side Dishes


When we sat down, ready to dig into the steaming seafood stew in front of us, we had to wonder if there was something missing.  How about something to slather with butter?  How about something to dip into our freshly made gumbo?  We wanted a muffin, but not just any muffin!  We're talking about the South!  So we baked up a batch of cornbread muffins with a honey molasses glaze!


Honey-Molasses Cornbread Muffins
By Chef E and Chef K


Yields 14-16 muffins


Ingredients:


1 1/4 cups yellow cornmeal, stone-ground
3/4 cup all-purpose flour
2 1/2 tsp baking powder
3 tbsp sugar
3/4 tsp salt
2 large eggs, beaten
1/4 cup oil
1 cup milk
1/2 cup frozen corn kernels, defrosted

4 tbsp raw molasses
1 oz water
1/2 tsp honey (preferably raw)

Directions:

Preheat oven to 425°F.

In a large mixing bowl, combine cornmeal, flour, baking powder, sugar and salt.  Beat in eggs.  Add oil and milk.  Add defrosted corn kernels.  Mix well.  Pour batter into well-greased muffin tins and bake for about 12 minutes or until golden brown.

To make glaze, place raw molasses and water in a small pot over low heat.  Mix well.  Add honey, dissolving it well.  Once the muffins are out of the oven, use a small pastry brush to apply a light layer of glaze to the top of the muffins.  

Let them cool and then devour them!


Bon Appétit!


Over a bed of rice with some sweet cornbread, a steamy serving of gumbo can turn any overcast summer day into one worth staying inside for.  But even on sunny days, what's better than a spiced spoonful of our favorite seafoods?  Cool your tongue with a white wine or a sparkling cider (alcoholic or not, it's up to you!) and this meal ought to be a crisp and delicious way to end your day!

Saturday, June 11, 2011

Grillin' and gobblin' everything up

Every summer, it's the same old thing: burgers, burgers, burgers up to your buns.  But so many of those flat, beef patties tend to be so dry and tasteless that we cover them with as many condiments as we can manage in order to come out victorious at the dinner table.  Is that diminished hockey puck the best we can do?  Have Americans, the champions of this summertime delight, really forgotten how to make a delicious burger?

And while beef may be "what's for dinner" most of the time, what ever happened to turkey burgers?  These delicious white-meat, condiment-carrying alternatives haven't been in style for years it seems.  Where are they now?  Merely on the menu for those people trying to watch their figures?  Are they dryly crumbling off in the "Lite Eats" section somewhere, tasteless and alone, without a bun to embrace them?

Well, The Giddy Gourmands say "No more!"  Turkey burgers have gotten a bad rap for being the dry and tasteless "diet" version of America's signature food, but it doesn't have to be that way.  Turkey has the unique ability of being a blank canvas of flavor, and although it may be a tad temperamental, that fowl can create a burger that tastes anything but.  All it takes is some creativity and a few spices (okay, and a few adjustments for locking in moisture) and you'll get a delicious, juicy burger just waiting for you to gobble it up.

"I've got class and taste!"
Twice the Spice Turkey Burgers
by Chef E and Chef K

Serves 12

Ingredients:

1 1/2 lbs ground turkey
2 eggs
1 small onion, diced
2 tsp garlic, minced
1 portobello mushroom, diced
1 crimini mushroom, diced
1/2 tsp salt
1 tsp paprika
1/4 tsp cayenne pepper
1 tsp white pepper

Directions:

Combine turkey and eggs in a bowl.  Mix well.  Add in onion, garlic, mushrooms, salt, paprika, cayenne, and white pepper.  Mix well.

Form turkey mixture into patties about 2 inches in diameter.  If you're not going directly to the grill, placing the patties on a platter in the fridge will stiffen them up, making it easier to retain their shape.

When grilling the burgers, grill at a lower temperature (between 250° and 300°F) for best moisture results.  Before serving turkey burgers, always check to ensure they are well done.


Condiments

Congrats!  You've got a burger.  But what do you put on it?  You can't ruin that gourmet turkey burger with Heinz 57!  So what are you going to put on that spicy sucker?  How about some gourmet ketchup to cool things down?

Homemade Ketchup
by Chef E

Ingredients:

2 (6 oz) cans tomato paste
3/4 cup (approx.) water
2 tsp white wine vinegar
3 tbsp brown sugar
2 tsp salt
1/2 tsp onion powder

In a small bowl, add tomato paste.  Slowly, add water, stirring periodically.  (Note: Depending on how thick you want your ketchup to be, you may want to adjust the amount of water.)  Add vinegar.  Add salt, brown sugar and onion powder.  Garnish as desired!


Side Dishes


Burgers and ketchup may be delicious, but some may contest that it doesn't make a meal.  Well, on a hot summer day, with a spicy burger, what sounds better than some sweet, cool cole slaw?  If you said "Nothing," you belong at our house!

Sweet 'n' Salty Cole Slaw
by Chef E

Serves 12

Ingredients:

1 1/2 (16 ounce) packages cole slaw mix
2 tbsp onion, minced
1/2 cup mayonnaise
1 cup milk
2 tbsp white wine vinegar
1 1/2 tbsp lemon juice
1/4 cup sugar
1/2 tsp white pepper

Combine mayonnaise and milk in a medium bowl until smooth.  Add vinegar and lemon juice.  Add sugar and pepper (to taste).  (Note:  Don't worry if your dressing seems too thick.  As the cabbage absorbs the dressing, it releases water, thinning it out.)

In a large bowl, combine the onion and cole slaw mix.  Add the dressing and toss.  Place in the fridge for at least an hour before serving.

Want to mix it up a bit?  Instead of using your off-the-shelf cole slaw mix, try chopping up a head of cabbage, two carrots and two small zucchinis into strings to get a nice veggie slaw.


Bon Appétit!


Top all that off with your favorite crisp soft drink or brew and you've got yourself a great summer treat to enjoy on the patio.  (We sure did!)  In fact, we'll leave you to it!  Who are we to keep you from biting into that beautiful bird?

 
Design by Free WordPress Themes | Bloggerized by Lasantha - Premium Blogger Themes | JCpenney Printable Coupons